Friday 27 November 2020

For My Beautiful Friend - Amazing Paper Grace

 Hello Buddies, 

Sharing new floral card with all of you designed with Amazing Paper Grace Delicate Impression Collection by Becca Feeken. I used two to three types of flowers in this card with Fanfare Border Glimmer Hot Foil Plate from Delicate Inpressions Collection by Becca Feeken.


Amazing Paper Grace Product Used:
1-  Fanfare Border Glimmer Hot Foil Plate from Delicate Inpressions Collection by Becca Feeken.
2- Shapeabilities Sweet Cottage Flowers Etched Dies 3D Vignette Mini Album Collection by Becca Feeken.
3- Shapeabilities Cinch and Go Flowers III Etched Dies Elegant 3D Vignettes by Becca Feeken.


Other Products : Jane Davenport Watercolors, Off-white Cardstock, Clear Glue, Die Cutting Machine, Hot Foil, Water Color Brush, Dimensional Tape, Beads,,Hot Glue, Nida Tanweer Magic Glitter Powder, Lace. Pink Peoney Archival Ink, Vibrant Fuchsia, Rose Madder. 


Friday 20 November 2020

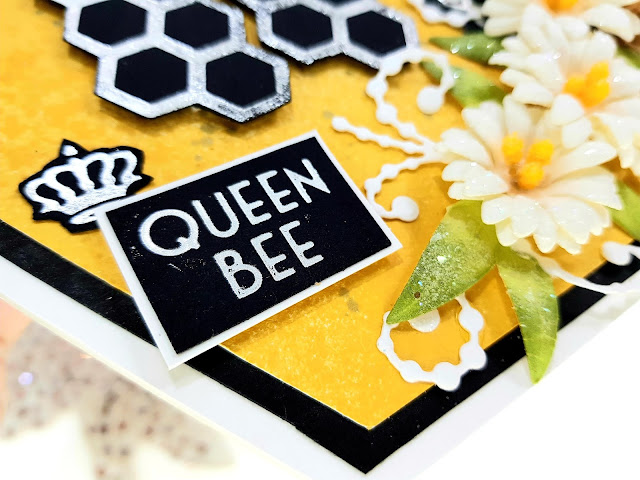
Queen BEE Honeycomb Card - Amazing Paper Grace

 Hello Buddies ... Happy Friday!

Do you know someone that can't easily get out in this beautiful weather? You can bring a bit of nature to them with this "QUEEN BEE" card featuring honeycomb, bee, water colored background, cute sentiment with adorable flowers from Amazing Paper Grace by Becca Feeken.

Amazing Paper Grace Product Used: 

1- Just Bee-cause Glimmer Hot Foil Plate & Die Set Sweet Cardlets by Becca Feeken SKU GLP-237
2- Shapeabilities Cinch and Go V Etched Dies Vintage Treasures SKU S4-995
3- Venise Lace SKU S5-309
4- 
ShapeabilitiesCandlewick Rosebud Etched Dies Candlewick Sampler Collection by Becca Feeken S4-1015

Other Products Used: Jane Davenport WatercolorsWhite cardstock, black cardstock, silver mirror card, silver glimmer foil, yellow stamens, off white cardstock, twine, leaf green archival ink, fern green archival ink, Nida Tanweer magic Glitter Powder.


Cut Honeycomb shape card on white cardstock adhere black card which is slightly smaller then cardbase, than add water color effect on white card and trim smaller then black and adhere on black card, hot foil all required images using glimmer machine, die cut BEE using coordinating die and fussy cut honeycomb and sentiment. Die cut circle from Venise Lace on black card and center shape on silver mirror cardstock, make few flowers and arrange all ready elements as shown.


Thanks Happy Crafting!


Wednesday 11 November 2020

Introducing the Amazing Paper Grace Delicate Impressions Collection


Delicate Impressions Details

We’re excited to introduce another Glimmer Hot Foil collection! The Delicate Impressions Collection has five sets of Glimmer Hot Foil Plates. The fifth set, Heart Melt Sentiments, has four unique phrases with matching dies. The other four sets are designed to create borders and accents that can be used on cards from A2 to 5 x 7-inches. Each elegant motif can be layered with itself or mix with others in the same collection or beyond.


Glimmer Hot Foil Plates are metal plates used in the Spellbinders Glimmer Hot Foil System to transfer foil to paper through a combination of heat and pressure.  Roll the Glimmer machine base through your die cut machine to deliver its beautiful design. Refer to Compatibility Charts on Spellbinders' website, to see if your machine is a match.


Our Creative Team members will showcase their creations made with the Delicate Impressions Collection today. For those of you who enjoy watercolors, we are using Jane Davenport Watercolors to highlight our projects. See if you can identify what techniques are being used!


Becca Feeken sent over these stunning plates and dies for me to try.

Each of our Creative Team members will show you their take on cards made with a Collection


My Projects For Today


First up is a card from Amazing Paper Grace SKU GLP-218 & GLP-234 by Spellbinders


Here is what the dies look like: 


 I designed ready foldout SHAKER CARD measures 9" by 6" and a matching gift box.

Other Products : Jane Davenport Watercolors, White Cardstock, Clear Glue, Die Cutting Machine, Hot Foil, Water Color Brush, Dimensional Tape, Beads, Confetti, Acetate Sheet, Hot Glue, Nida Tanweer Magic Glitter Powder.


Designer Tip: Use Jane Davenport fine tip brush to color perfectly into tiny images.

Delicate Impressions Availability:

These dies and plates are available from Spellbinders right now! Click Delicate Impressions Collection.


Collection Blog Hop!

Click on the links to each member, they're waiting to inspire you to create something beautiful:


Visit Beatriz Jennings
Visit Patricia Manhire
Visit Agnieszka Posluszny
Visit Elena Olinevich
Visit Sathya Kala Sankaran
Visit Nida Tanweer
Visit Tara Brown
Visit Anita Kejriwal
Visit Linda Parker
Visit Kate Skonieczna
Visit Joanna Wisniewska
Visit Becca Feeken at Amazing Paper Grace


Giveaway!  

You could win an Amazing Paper Grace Die of the Month! Enter to win on our new Instagram Account https://www.instagram.com/amazingpapergrace_creates/. All  of the entry details are there, look for this image below:


I love your comments! Which color combo you like the most?

Thank You!
Follow for more inspiration.
@nidahandmadecards

Tuesday 10 November 2020

Debuting Dazzling Dahlia Collection - Heartfelt Creations by Nida Tanweer

 Good Morning Crafters!

Happy Wednesday... Today Heartfelt Creations debuting amazing Dazzling Dahlia Collection. This collection is designed for you to create large, impressive flowers, full of dimensional layers simply and easily. Whether you need a single flower with layers that transcend the card or you want to create an impressive bouquet exploding with color, the Dazzling Dahlia is versatile enough to have you covered for any occasion, and any skill level!
 

Other Products : Dimensional adhesive, water mister, hot glue, hot glue gun, scissors, funnel tray, paper trimmer, die cutting machine, Distress Ink Mowed Lawn, Nida Tanweer Magic Glitter Powder, Twine, Pearls, Glass Beads, Crystal Beads, Sequence, Water Color Brush.


Instructions : For the card base take a Deluxe Paper measures 12” by 9” score 6”, Trim a panel from Deluxe paper  measures 5 ¾ by 8 ¾ and adhere onto the card base using dimensional tape. Trim a paper from paper collection measures 5 ½ by 8 ½ adhere on white panel using clear glue.
Diecut frame on Deluxe Flower shaping paper using Intricate Swirl Frames Die apply glue from sponge and cover frame with glitter and adhere this frame on card frame using Darice foam strips. 
Stamp both stemmed dahlia from Dahlia and Leaves Cling Stamp Set in Leaf Green ink onto flower shaping paper and diecut with coordinating dies. Stamp 8 of the smaller dahlia petals from Dazzling Dahlia Cling Stamp Set in Forget-Me-Not ink onto the Deluxe paper and diecut with coordinating dies. Stamp the ‘Happy Birthday’ sentiment in Forget-Me-Not ink onto white cardstock and cut with Scissor color the sentiment tag edges with leaf green ink using dauber.
Color Stamped buds and dahlia stems with Zig markers and color leaves with leaf green ink and mowed lawn ink Use the Stack and Store daubers to color the flowers and leaves. Color the Dahlia Flowers centers with pink peony inks and edges Forget-Me-Not Color the backside of petals with Pink peony. Use the dahlia shaping mold and shaping stylus to shape the petals. Adhere 4 petals to make one flower, add clear glue in the center add pearls glass beads and crystal beads in the center. Apply clear glue on the flowers using sponge and dressed with flowers with Nida Tanweer Magic Glitter Powder add crystal laquare to embellish the flowers and dry.
Diecut some Swirly Border Accents on white card, cut a part cover with glitter, add twine and assemble the ready elements using dimensional tape and hot glue as showed.

Thank You!
Follow for more inspiration.
@nidahandmadecards

Friday 6 November 2020

Pop Up 3D Vignette Poinsettia Sleigh - Amazing Paper Grace


Are you ready to sleigh it?  Today I'm sharing the Amazing Paper Grace Die of the Month for November 2020 - Pop Up 3D Vignette Poinsettia Sleigh.  This one is a little bit different because it folds down flat for mailing as do all the dies in the 3D Vignette lines.


Becca Feeken of Amazing Paper Grace sent me these lovely dies to create with.


Poinsettia Sleigh Details


This die can be used as flat detail on a 2D surface but transforms into a 3D show piece so easily that we're happy you will have both options.  Becca traditionally creates a high end die that doubles as a decoration piece in November of each year.  Let's just call it icing on the cake for the holidays.  It's really a satisfying venture to grab a cup of coffee and sit down to put it together as it is to set it out on the table. 

Today we want to inspire you to think of different combinations using the Poinsettia Sleigh.  Here's what we had in mind:

  1. Table Center Piece
  2. Table Setting Favor
  3. Filled with Candy and Goodies
  4. Part of a Wonderland Menagerie
  5. Flat 2D on the front of a card

    In the comments let us know how you think it should be used. 


My Project Today using the Pop Up 3D Vignette Poinsettia Sleigh

I designed card with Sleigh and Poinsettia, with 3D Sleigh full with Poinsettias. 


Supplies:

Paper: Navy Blue Cardstock, Golden Mirror Card, Any Blue Pattern Paper

Accessories:  Amazing Paper Grace November 2020 Die of the Month - Pop Up 3D Vignette Poinsettia Sleigh SKU DOMAPG-NOV20


Venise Lace SKU S5-309


Thank You!
Follow for more inspiration.
@nidahandmadecards

Tuesday 3 November 2020

Vellum Oakberry Blooms Card - Heartfelt Creations

 Happy Wednesday....
Welcome to my blog.. Sharing beautiful floral card for all of you, designed with Heartfelt Creations Oakberry Lane Vellum Flowers. I hope you will enjoy each step.


Other Products :Twine, Nida Tanweer Magic Glitter Powder, scissors, Vellum Paper, funnel tray, hot glue, die cutting machine, Mowed Lawn Distress ink, Cracked Pistachio Distress Oxide, White Embossing powder, Versamark Embossing Ink, Dimensional Tape, any lace.


Instructions : For the card base take a white cardstock from Heartfelt Creations Deluxe Flower Shaping Paper measures 12” by 9” score 6”. Cut a white card panel measures 5 ¾ by 8 ¾ adhere onto card base using dimensional tape. Trim a paper from paper collection measures 5 ½ by 8 ½ and adhere onto the white card base using designer dries adhesive. Adhere lace piece on the right side of the card front using clear glue. Trim another panel from paper collection measures 4 7/8 by 8 ½, adhere lace on the edge of panel right side using clear glue and adhere this panel on the card using dimensional tape.
Cut both frames (2x) from Rounded Frame Die on deluxe paper use circle dies for making hole, layered both same diecuts together for sturdiness, cover both frames with Nida Tanweer Magic Glitter Powder, adhere both rounded frames as shown using dimensional adhesive.
For the flowers stamp the Oakberry Lane flowers from Oakberry Lane stamp set using Versamark Embossing ink on vellum paper cover it with white embossing powder and heat it using heat tool, diecut all flowers using coordinating die, color from back using cracked pistachio distress oxide ink, shape the flower using shaping Kit and take 2 same size layers of flowers to make 1 flower using hot glue gun. Add antique linen ink on white stamens and add into the flower centers. Make different size of flowers.
Stamp the leafy accents from leafy accents stamp set with leaf green ink and color it Vivid ink and diecut using coordinating dies. Shape it using mold. Use the Stack and Store daubers to color the leafy accents. Color the edges with mowed lawn ink. Add some glue and cover flowers and leafy accents with Nida Tanweer Magic Glitter Powder.
Arrange all ready elements as shown add twins, stamp the sentiment on white card using Leaf Green Ink from Today’s Quotes shade the edges with cracked pistachio ink.
Embellish the card with crystal lacquer, white and green Nuvo Drops.

Thank You!
Follow for more inspiration.
@nidahandmadecards