Wednesday, 29 April 2020

Elegant Birthday Card - Heartfelt Creations

Hi Buddies,

Happy Wednesday!!


HC Products Used :

HCD2-7307 Royal Elegance Frames Die
HCD1-7293 French Cottage 'scapes Die
HCPC-3909 French Cottage 'scapes Cling Stamp Set
HCPC-3843 Special Birthday Sentiments Cling Stamp Set
RACP436 Ranger Archival Ink Leaf Green
RACP468 Ranger Archival Ink Pad - Jet Black
RACP663 Ranger Archival Ink Pad – Tea Rose
Stack and Store Daubers-Pack of 30
Deluxe Flower shaping paper –pack of 50
159723, Designer Dries clear Adhesive
352854 Metal Tip for Adhesive Bottles
DDOTS Double Dots 100pc. -3D Foam Circle
D120601 Darice Adhesive Foam StripsZig Clean Color Real Brush Markers - 36 Pack 478455

Other Products: Off white cardstock, Tattered Rose Distress Ink, White Pearls, half cut pearl beads, nuvo drops, Orange Ribbon, Scoring board, die cutting machine, Glitter dust.


Instructions: For the card base use frame border die and and make a folding card, Cut frame die on off white card and adhere on the card base front using designer glue. Cut second frame die and layer on the first frame using foam dots. Cut small frame from the die set stamp sentiment using black ink from birthday sentiment stamp set and adhere this frame using foam dot.

For the flowers stamp the flowers with tea rose ink and color it using tattered rose and make flowers after shaping add pearls using hot glue gun, for the leaves stamp with leafy green ink color it using zig markers and make a bunch on ribbon bow.

Arrange the flowers and leaves on the card front as shown. Add glitter dust to embellish the flowers and add extra sparkle.

Embellish the card using pearl beads and nuvo drops.

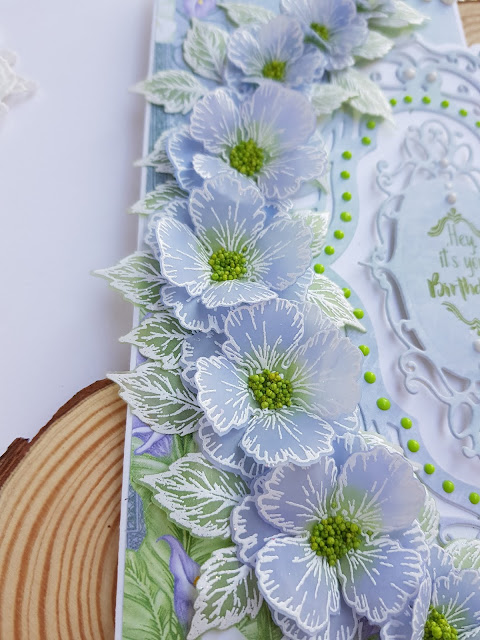
Birthday Card With Vellum Flowers - Heartfelt Creations

Hello Friends,
Happy Wednesday!


HC Products Used :

HCD2-7309 Elaborate Oval Frames Die
HCD1-7200 Oakberry Lane Blossom Die
HCPC-3842 Oakberry Lane Blossom Cling Stamp Set
HCPC-3843 Special Birthday Sentiments Cling Stamp Set
Calla Lily Paper Collection HCDP1-2110
RACP436 Ranger Archival Ink Leaf Green
Stack and Store Daubers-Pack of 30
Deluxe Flower shaping paper –pack of 50
159723, Designer Dries clear Adhesive
352854 Metal Tip for Adhesive Bottles
DDOTS Double Dots 100pc. -3D Foam Circle
D120601 Darice Adhesive Foam Strips
ANC825 Ribbit Prills

Other Products: White half Pearl Beads string, Vellum card, Ranger White Embossing Powder, Versamark Ink, Heat Tool, scoring board, die cutting machine, white card stock, Ribbon Glitter dust, Nuvo drops.


Instructions: The finished card measures 8.5 inches by 6 inches. Trim both half sides of the card base with border die and make folding card base. Trim card front panel from paper collection and adhere it using clear glue. Trim 2 frame bases with border die and layer it, cut frame die from Calla Lilly patterned paper and layer it as shown. Cut the small frame on patterned paper, stamp the sentiment with leafy green ink and adhere using foam dots.
Add pearl strings on the card borders top and bottom. For the flowers, stamp the flowers and leaves images using versamark embossing ink, cover with white embossing powder and heat it with heating tool. To color the flowers, use shaded lilac from the back side add ribbit prills in the centers after shaping. Make many flowers.
Arrange the flowers and leaves on the card front as shown. Add nuvo drops to embellish the card.


Tuesday, 21 April 2020

Pearly Birthday Card - Heartfelt Creations

Good Morning Everyone, Happy Wednesday!
Heartfelt Creations Debuting the Magestic Frame Dies which is intricate, elegant and magestic, for perfect crafting projects, and today for the inspiration I designed this super elegant Pearly Birthday Card <3
I just love how these dies make me feel so talented.


Heartfelt Creations Products Used:
HCD2-7308 Majestic Swirl Frames Die
HCD1-7200 Oakberry Lane Blossom Die
HCPC-3842 Oakberry Lane Blossom Cling Stamp Set
HCPC-3843 Special Birthday Sentiments Cling Stamp Set
HCDP1-2113 Wild Rose Paper Collection
RACP436 Ranger Archival Ink Leaf Green
RACP524 Archival Ink Pad – Vibrant Fuchsia
HCGP1-488 Luxe gold paper
RACP468 Ranger Archival Ink Pad - Jet Black
Stack and Store Daubers-Pack of 30
Deluxe Flower shaping paper –pack of 50
159723, Designer Dries clear Adhesive
352854 Metal Tip for Adhesive Bottles
DDOTS Double Dots 100pc. -3D Foam Circle
D120601 Darice Adhesive Foam Strips
ANC825 Ribbit Prills


Other Products: White half Pearl Beads, Ranger White Embossing Powder, Versamark Ink, Heat Tool, scoring board, die cutting machine, white card stock, Ribbon Glitter dust.


Instructions: The finished card measures 7.5 inches by 5.5 inches. To make the mat layer, trim white card measuring 7.3 inches by 5.3 and set aside. Trim pattern paper from Wild Rose paper collection measuring 7.1 inches by 5.1 inches, adhere on the white panel using dries glue and add this layer on the card base. Cut small frame on white card and make window. Stamp the sentiment inside the window using vibrant fuchsia ink.
For the flowers, stamp the flowers and leaves images using versamark embossing ink cover with white embossing powder and heat it with heating tool. To color the flowers, use vibrant fuchsia archival ink. To color the leaves, use leaf green ink. Shape using shaping tools and add prills in the flower centers.
Arrange the flowers and leaves on the card front as shown. Add glitter dust to embellish the flowers. Add half pearl beads.

Thank You!

Saturday, 18 April 2020

Pazzles Design Team 2020-2021

So happy to announce that im in Pazzles 2020-2021 Design Team, Thank you so much Klo !!!!
I am truly blessed . It's a great feeling to be back again as a Creative Designer . Thank you in believing in my work.
 Congratulations to all members and welcome to new friends. ðŸ’—💗💗


You can see all my Pazzles projects Here → Nida Tanweer Projects

Thank You!

Tuesday, 14 April 2020

Garden Wishes - Heartfelt Creations by Nida Tanweer

Happy Wednesday Friends, Good Morning!

I hope you all are safe and healthy, It's inspiration Wednesday today and I'm sharing my second card from French Cottage Collection. I hope you enjoy.


Products Used:
French Cottage 'scapes Cling Stamp Set, HCPC-3909
French Cottage 'scapes Die, HCD1-7293
French Cottage Paper Collection, HCDP1-2114
Cottage Lifestyle Cling Stamp Set, HCPC-3910
Cottage Lifestyle Die, HCD1-7294
Cut Mat Create 1A Die, HCD2-749
Ornamental Tags Die, HCD1-7203
Intricate Swirl Frames Die, HCD2-7191
Deluxe Flower Shaping Paper Pack of 50 - White, HCPP1-475
Stack and Store Daubers-Pack of 30, HCDA2-450
Deluxe Flower Shaping Kit, HCST1-401
Ranger Archival Ink Pad - Jet Black, RACP468
Ranger Archival Ink Pad - Tea Rose, RACP663
Ranger Archival Ink Pad - Vermillion, RACP461
Ribbit Prills, ANC825
Go Man Go Prills, ANC818
Darice Adhesive Foam Strips, D120601
Double Dots 100pc. -3D Foam Circles, DDOTS

Other Products: Smooth White Card Stock, Mowed Lawn Distress Ink, Hot Glue Gun, Die Cutting Machine. Score Board, Nuvo Drops.


Instructions: The ready top fold card from white card stock measures 9" by 6". To prepare the card front, Choose the papers from the designer paper collection of French Cottage Collection and chop the paper for the front panel. Also cut a panel from a smooth white cardstock measuring 1/16" smaller on all sides for the card front. Glue the printed paper on the cardstock and cut a window using Cut Mat Create 1A Die. Choose another scenic paper from the designer paper collection and adhere to it from the back of the window. Layer the card front on the ready card panel. Cut the frame on white card using Intricate frame die, cover with glitter dust and adhere in the window borders.
Stamp the required images from the same collection with black archival ink and paint them using Zig Clean Clear Brush Markers. Cut all the images using their coordinating dies.
For flowers, stamp multiple flowers of both sizes using Vermillion archival ink on deluxe flower shaping paper and cut them using coordinating dies. Color the flowers using Archival ink Tea Rose. Shape the flowers using Deluxe Flower Shaping Kit and add Prills to the center, using an adhesive that dries clear and dress it with glitter dust. Color leaves branch with mowed Lawn Distress Ink using dauber. Shape using Deluxe Flower Shaping Kit.
Once all the elements are ready, assemble the card as shown, creating a scenic view. Finish the card by adding a sentiment from Ornamental die set. Embellish the card with Nuvo drops.


Thank You!

Wednesday, 8 April 2020

Debuting French Cottage Collection - Heartfelt Creations by Nida Tanweer


Hi Friends,
How are you on this beautiful April Wednesday morning? Today is the day the French Cottage Collection from Heartfelt Creations debuting. Very excited about this collection. Here is my first card using this wonderful collection.


Products Used:
French Cottage 'scapes Cling Stamp Set, HCPC-3909
French Cottage 'scapes Die, HCD1-7293
French Cottage Paper Collection, HCDP1-2114
French Doorway Cling Stamp Set, HCPC-3908
French Doorway Die, HCD1-7292
Ornamental Tags Die, HCD1-7203
Deluxe Flower Shaping Paper Pack of 50 - White, HCPP1-475
Stack and Store Daubers-Pack of 30, HCDA2-450
Deluxe Flower Shaping Kit, HCST1-401
Zig Clean Color Real Brush Markers - 36 Pack, 478455
Ranger Archival Ink Pad - Jet Black, RACP468
Ranger Archival Ink Pad - Tea Rose, RACP663
Ranger Archival Ink Pad - Vermillion, RACP461
Ribbit Prills, ANC825
Double Dots 100pc. -3D Foam Circles, DDOTS
Darice Adhesive Foam Strips, D120601

Other Products: Smooth off-White Card Stock, Mowed Lawn Distress Ink, Die Cutting Machine. Score Board, Art Pebbles, Glitter Dust, Pink Thread String, Hot Glue Gun.


Instructions: The ready top fold card from off-white card stock measures 7.3" by 7.1". To prepare the card base, cut a panel from same off-white cardstock measuring 7.1" by 6.9" and layer on card base using foam strips. Choose the papers from the designer paper collection of French Cottage Collection and chop the paper panel for card front . Make sure the panel is smaller so that it creates a delicate border all around the card base. Once the card base is ready, keep it aside and start working on the focal images.
Stamp the required images from the same collection with black archival ink and paint them using Zig Clean Clear Brush Markers. Cut all the images using their coordinating dies.
For flowers, stamp multiple flowers of both sizes using Vermillion archival ink on deluxe flower shaping paper and cut them using coordinating dies. Color the flowers using Archival ink Tea Rose. Shape the flowers using Deluxe Flower Shaping Kit and add Prills to the center, using an adhesive that dries clear and dress it with glitter dust. Color leaf branch with mowed Lawn Distress Ink using dauber. Shape using Deluxe Flower Shaping Kit.
Once all the elements are ready, assemble the card as shown, creating a scenic view. Finish the card by adding art pebbles and a sentiment from Ornamental die set along with pink thread.


Wednesday, 1 April 2020

Gift For You - Heartfelt Creations


Hello Everyone!!
I hope you all are safe and healthy, today is a Wednesday means Heartfelt Creations Inspirational Wednesday and here is a gift from me to you, Stay Home <3


Products Used:
Small Wild Rose Die, HCD1-7289
Large Wild Rose Die, HCD1-7290
Small Wild Rose Cling Stamp Set, HCPC-3906
Large Wild Rose Cling Stamp Set, HCPC-3907
Wild Aster Paper Collection, HCDP1-2106
Heart of Joy Decorative Die, HCD1-7256
Eyelet Circle & Basics Small Die, HCD1-7154
Rounded Window Frame Die, HCD1-7271
Ornamental Tags Die, HCD1-7203
Deluxe Flower Shaping Paper Pack of 50 - White, HCPP1-475
Ranger Archival Ink Pad - Vibrant Fuchsia, RACP524
Ranger Archival Ink Pad - Leaf Green, RACP436
Ribbit Prills, ANC825
Stack and Store Daubers-Pack of 30, HCDA2-450
Double Dots 100pc. -3D Foam Circles, DDOTS
Scor-Pal Measuring & Scoring Board, 173842
Darice Adhesive Foam Strips, D120601
Nuvo Crystal Drops Gloss - Apple Green, NU669

Other Products: Mowed Lawn & Vintage Photo Distress Ink, hot glue gun, paper trimmer, die cutting machine


Instructions: Using ready card base measures 9 x 6". It’s a top fold card. Cut a panel of white cardstock measures 8.8 x 5.8" and adhere on the card base using foam strips. Cut another panel from Wild Aster Paper Collection measures 8.6 x 5.6" and adhere on the white panel using designer Dries Clear adhesive.
Cut two strips of white cardstock measures 8 x 1" and cute two strips from a paper collection which is slightly smaller than white strips and adhere pattern strips on white strips using clear glue. Adhere strip in cross shape on the left slide using 3D foam dots.
Cut 2 shapes from Heart of Joy Decorative die, one on white card and one on pattern paper and stack together using clear glue. Cut doily frame from Round Window Frame Die and set aside. Cut circle from paper collection using Eyelet Circle & Basic Small Die and paste it on round doily frame.
Stamp the flowers from Small Wild Rose Cling Stamp Set on Deluxe Flower Shaping Paper using Vibrant Fuchsia Ink and color with same color using daubers, cut out with coordinating dies, and make three buds and few flowers after shaping with shaping tools than add glitter and prills. Stamp leaves from Large Wild Rose Cling Stamp using leafy green archival ink and color it with mowed lawn distress ink and shape using shaping tool and dress it with glitter. Add Crystal lacquer on flowers and leaves for water drops effect.
Cut sentiment on white card and base on pattern paper using Ornamental Tags Die and layer together using clear glue. Arrange all ready elements, make a bouquet of roses as shown. Add Sentiment tag using foam dots and embellish card using Green Nuvo Drops.

Thank You!

Designed by Nida Tanweer