Showing posts with label diy. Show all posts

Tuesday, 14 December 2021

Wheel of Time - Heartfelt Creations

 Good Morning Buddies Happy Wednesday!

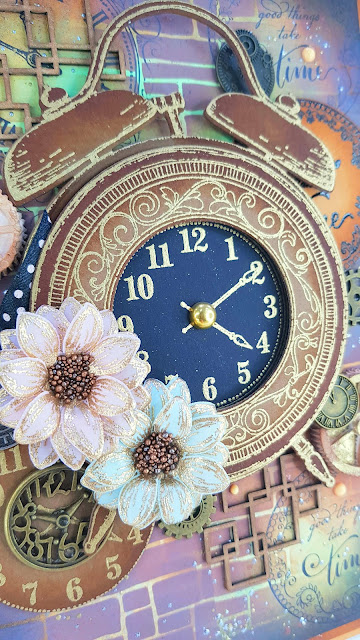
Here is my another inspiration from Heartfelt Creations Moments in Time Collection using stenciling technique ⏱
Check complete product list from HERE!


Instructions : It is a ready folding card size is 9 inches by 6 inches. Cut panel on light brown cardstock measures 5 7/8 by 8 7/8 adhere it on card base using dimensional tape. Cut another panel which is slightly smaller then last panel on Deluxe Paper apply cracked pistachio and vintage photo distress ink on the panel randomly using ink brushes, apply vintage photo distress ink by using stencil and ink blending brush on the card base, Randomly stamp the 'Good things Take Time' stamp on the panel using black ink from Timepiece Sentiments Cling Stamp Set, and stamp center clock part of Elegant Moments Timepiece stamp on the left corner of the card using black ink. sprinkle some Perissa embossing powder on the panel and heat it from the back side.

Stamp the Good things take time image from Timepiece Sentiments Cling Stamp Set on the light brown cardstock using versamark ink cover with black card stock and heat it using heating tool die cut using coordinating die.

Stamp the clock and arms image on black cardstock from Simple Moments Timepiece Stamp Set with versamark embossing ink cover with golden embossing powder and heat it using heat tool, die cut using 3rd circle from same die set. Make a hole in the center add arms and close by brads.

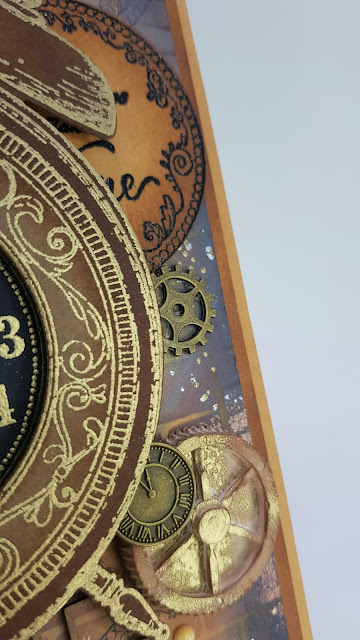
Stamp the clock image from Simple Moments Timepiece Stamp Set on brown cardstock with versamark embossing ink 2x and cover with Gold Tinsel Embossing Powder, heat it using heat tool, die cut using main clock die from Simple Moments Timepiece Die Set and die cut second clock by using big circle die and 4th circle die and make clock frame window. Adhere foam dots from the back side and set a side.

Color the edges of all diecuts with Vintage photo distress ink.

Adhere black clock circle on the main big clock die cut using clear glue, set clock frame window on the black dial as shown.

For the flowers stamp second last flower sizes from rustic sunflower collection on to the pink and mint vellum Paper using versamark ink cover with gold tinsel embossing powder heat it using heating tool. Die cut using coordinating dies, shape the flowers using shaping kit, make two flowers, add three layers of same size for making each flower. Add clear glue in the centers sprinkle mini prills. 

Paint the moulds and wooden embellishments with Vintage photo distress ink.

Arranged all ready elements using dimensional tape and hot glue gun and embellish the card with nuvo drops and metal charms.

Other : Die Cutting Machine, Brown Cardstock, Light Brown Cardstock, Black Cardstock, Light Pink Vellum Paper, Mint Vellum Paper, Versamark Embossing Ink, Metal Charms, Golden Embossing Powder, Black Embossing Powder, Gold Tinsel Embossing Powder, Vintage Photo Distress Ink, Vintage Photo Oxide Ink, Cracked Pistachio Distress ink, Ink Blender Brushes, Wooden Embellishments, stencil, Molds, Brats, Brush, Wow Perissa embossing powder, Dimensional Tape, Hot Glue Gun, palette knife, Ribbon.

Follow me on Facebook!
Follow me on Instagram!
Follow me on YouTube!
Pinterest!

Happy Crafting!

Tuesday, 17 August 2021

On Your Special Day Gateway Card - Heartfelt Creations

 Hello Friends... Happy Wednesday!
How is your week going? Today I'm here with folding card designed with Heartfelt Creations latest release Home For The Holiday Paper & Decorative Elegant Swirly Gateway Dies!

Check complete products here!


Instructions : Taking 5 by 7 inches Gateway Fold Card for card base, for the cutting of card base panels use first big shadow die from Teardrop Lattice Gateway Die Set and cut four panels from Home for the Holiday Paper Collection and adhere on to the card base.

Die cut eight door frames using Elegant Swirl Gateway Die, four on Deluxe Flower Shaping Paper and four gates frames paper collection adhere pattern paper die cuts on white gate for the sturdiness using clear glue and add these four frames on the card base panels using clear glue.

Stamp required images from Holiday Village Stamp Set and Home for the Holidays stamp Set in Coffee Archival Ink Except Tree Images, Stamp Tree Images from Holiday Village Cling Stamp Set and Leafy Accents from Leafy Accents Cling Stamp Set in Fern Green Archival Ink.

Stamp Classic Rose smallest three sizes in For Get Me Not Archival Ink on Deluxe Flower Shaping Paper color the flowers using French Ultramarine Archival Ink using Daubers Die cut using coordinating dies, shape the flowers using 3D Rose Shaping Mold, make a hole in each flower layer using needle part of golf groove tool add white Pastel Bead Stamens using hot glue.

Color the images using zin clean brush markers die cut using coordinating dies add images as shown using foam strips.

Color Leafy accents with Vivid Chartreuse and edges with mowed lawn distress ink using daubers shape the leafy accents in leafy accents shaping mold apply clear glue using sponge and cover with Nida Tanweer Magic Glitter Powder.

Stamp the sentiments using Fern Green Archival Ink from Special Birthday Sentiments Cling Stamp Set.

Arrange Leafy Accents and flowers as shown using hot glue gun.

Follow me on Facebook!
Follow me on Instagram!
Follow me on YouTube!
Pinterest!

Tuesday, 25 February 2020

Window Card - Heartfelt Creations by Nida Tanweer

Hello Everyone!
Happy Wednesday!!

Welcome back, here i'm with my cute window card which is from Tea Time Collection.


HC Products Used:

HCPC-3905 Elegant Teapot & Florals Cling Stamp Set
HCD1-7288 Elegant Teapot & Florals Die
HCD1-7287 My Cup of Tea Die
HCPC-3904 My Cup of Tea Cling Stamp Set
HCDP1-2112 Tea Time Paper Collection
HCD1-7278 Cottage Garden Hydrangea Die
HCPC-3900 Cottage Garden Hydrangea Cling Stamp Set
HCD1-7157 Eyelet Oval & Basics Large Die
HCPP1-475 Deluxe Flower Shaping Paper Pack 50- White
159723 Designer Dries Clear Adhesive
RLHS100 Hydra Sponges
RACP468 Archival Ink Pad – Jet Black
HCGP1-488 Luxe Golden Cardstock
ANC804 Heart of Gold Prills
478455 Zig Clean Color Real Brush Markers – 36 Pack
Stack and Store Daubers-Pack of 30 HCDA2-450
DDOTS Double Dots 100pc. -3D Foam Circles
DMCT4185 Groove Golf Tool Set
359503 Funnel Tray
   173842 Score-Pal Measuring & Scoring Board

Other Products: White Cardstock, Dusty Concord and Salty Ocean Distress Ink, Hot Glue Gun.


Instructions : Using ready card base measures 4.5” by 6.5". It’s a top fold card. Trim oval shape on card front using eyelet oval basic die. Cut a panel from Tea Time Paper collection measures 3.9” by 5.9” and adhere on purple paper from paper collection and make border adhere both layers using clear glue. Trim oval on this layer too using same oval die and adhere this panel on card base and make window.


Cut scallop oval on golden card and make window inside using same oval basic die and adhere this golden frame on card front base.
Stamp all required images from the Elegant Teapot & Florals Cling Stamp Set and My Cup of Tea Cling Stamp Set in black on white card, color with zig and and distress ink and cut out with corresponding dies.


Stamp the flowers from Cottage Garden Hydrangea Cling Stamp Set with Salty Ocean ink and color with dusty concord distress ink using daubers, cut out with coordinating dies, spray little water and shape with shaping tools add glitter and prills after shaping.


Place the ready Teapot inside the card using 3d foam tape. Add all ready elements and few flowers on the left side on the card front as showed. Add sentiment from paper collection inside the card.

Happy Crafting!

Created By: Nida Tanweer


Tuesday, 11 February 2020

Debuting The Tea Time Collection - Heartfelt Creations by Nida Tanweer

Good Morning!
How are you on this beautiful February Wednesday morning? Today's the day the Tea Time Collection becomes available to everyone! Infuse your time in the craft room with the fun and excitement of creating elegant teapot shaped card creations, perfect for celebrating all of life’s grandest occasions! Today's the day the Tea Time Collection becomes available to everyone! Infuse your time in the craft room with the fun and excitement of creating elegant teapot shaped card creations, perfect for celebrating all of life’s grandest occasions! Decorating becomes quick and EZ with a delightful selection of wonderful tea themed accessories, along with coordinating sentiments, allowing you to design and embellish a fanciful and unique teapot shaped card that is sure to impress friends and loved ones!
Here is my first card with this beautiful collection i hope you enjoy!


HCPC-3905 Elegant Teapot & Florals Cling Stamp Set
HCD1-7288 Elegant Teapot & Florals Die
HCD1-7287 My Cup of Tea Die
HCPC-3904 My Cup of Tea Cling Stamp Set
HCDP1-2112 Tea Time Paper Collection
HCD1-7283 Courtyard Elegance Die
HCD1-7278 Cottage Garden Hydrangea Die
HCPC-3900 Cottage Garden Hydrangea Cling Stamp Set
HCPP1-475 Deluxe Flower Shaping Paper Pack 50- White
159723 Designer Dries Clear Adhesive
RLHS100 Hydra Sponges
RACP468 Archival Ink Pad – Jet Black
RACP524 Archival Ink Pad – Vibrant Fuchsia
HCGP1-488 Luxe Golden Cardstock
ANC818 Go Man Go Prills
478455 Zig Clean Color Real Brush Markers – 36 Pack
Stack and Store Daubers-Pack of 30 HCDA2-450

DDOTS Double Dots 100pc. -3D Foam Circles
DMCT4185 Groove Golf Tool Set
359503 Funnel Tray
   173842 Score-Pal Measuring & Scoring Board

White Cardstock, Twisted Citron and Tumbled glass Distress Ink, Hot Glue Gun, Green Tread String, Distresser tool.


Instructions: Ready card base measures 9” by 6". It’s a top fold card. Cut a panel of white cardstock measuring 8.8” by 5.8” and rough the edges using distresser tool. Cut another panel from Tea Time Paper collection rough the edges and adhere these both panels together using designer dries glue and adhere this on card base using 3D foam.
Stamp all required images from the Elegant Teapot & Florals Cling Stamp Set and My Cup of Tea Cling Stamp Set in black on white card, color with zig and and distress ink and cut out with corresponding dies.
Stamp the flowers from Cottage Garden Hydrangea Cling Stamp Set with vibrant fuchsia and color with same color with daubers, cut out using coordinating dies, spray a little water and shape with shaping tools add glitter and prills after shaping.
Cut Round doily from Courtyard Elegance Die from Luxe gold card and cut simple circle from same die on Pattern paper, adhere golden doily on circle base. Place this circle on the card from top side arrange hydrangea bouquet as shown and arrange all ready elements using 3d foam as shown. Make a hole in spoons handle and add green string and adhere as pictured. Add sentiment from paper collection.


Created By: Nida Tanweer

Heart Shaped Love Card - Pazzles

Hello Everyone…
Here at my home in Karachi, I am enjoying the chilly weather. I hope you are enjoying a cool breeze or a warm spring day in your home town too. Today I’m here with a very beautiful card, perfect for an early spring card.


This card includes “LOVE” sentiment along with beautiful lilac flowers in a heart-shaped card. This is a wonderful card for Valentine’s Day, an anniversary, or a wedding.


I hope you enjoy creating this card. I have included step-by-step instructions, the cutting file in SVG, AI, and WPC, and a supply list.  


Tuesday, 10 September 2019

Debuting Wild Aster Collection - Heartfelt Creations by Nida Tanweer

Hello Everyone!

It's 11th September 2019, most awaiting day! Yes it is Heartfelt Creations new release date. Warm summer breezes have begun to cool, and daylight hours have started to shorten…tall grasses rustle in the wind preparing to make their way to seed, and leaves slowly begin their tumble to the ground to insulate the earth for the cooler upcoming season. As summer begins to fade, and the bright hues of heat loving florals dim, it is then that the graceful aster takes the limelight and becomes the crowning glory of the autumn season, lending it one last burst of color with their blends of pretty purples, pleasing pinks, and blazing blues! Join us as we bid summer farewell and celebrate the arrival of the autumn season with the Wild Aster Collection from Heartfelt Creations! Take a walk among the last perennial wildflowers of the waning summer season as you delve into a paper collection draped in light and airy asters hued in vibrant fuchsias and pretty purples, all accented with glorious greens, precious pinks and tranquil creams. Enjoy alluring backgrounds filled with dainty lace like accents, grand vintage style stripes, and beautiful brocades, all ready to set the stage for captivating aster arrangements! A lovely assembling of cling stamp sets filled with pleasing aster illustrations unite to create pretty wildflower sprays and elegant bouquets, while a stunning collection of beautifully illustrated aster petal images, when paired with the corresponding dies, join together harmoniously to create light, airy, dimensional aster flowers perfect for creating elegant autumn inspired floral clusters! So, grab your sweater and join us for one last walk through the garden as we take in the simplicity and beauty of the glorious wild aster! 


Products Used:

Designer Dries Clear Adhesive, 159723
Metal Tip for Adhesive Bottles, 352854
Color In Watercolor Brush - Fine, 409311
Zig Clean Color Real Brush Markers - 36 Pack, 478455
Darice Adhesive Foam Strips, D120601
Wild Aster Die, HCD1-7257
Wild Aster Spray Die, HCD1-7258
Wild Aster Scroll & Cluster Die, HCD1-7259
Eyelet Oval Die, HCD1-776
Stack and Store Daubers-Pack of 30, HCDA2-450
Wild Aster Paper Collection, HCDP1-2106
Wild Aster Cling Stamp Set, HCPC-3887
Wild Aster Spray Cling Stamp Set, HCPC-3888
Wild Aster Scroll & Cluster Cling Stamp Set, HCPC-3889
Pastel Bead Stamens-Medium, HCS1-457-3
Deluxe Flower Shaping Kit, HCST1-401
Nuvo Crystal Drops Gloss - Apple Green, NU669
Ranger Archival Ink Pad - Leaf Green, RACP436


Other Products: Off White Cardstock, White cardstock, Paper Trimmer, Die Cutting Machine, Yellow-Orange-Copper Glass Beads, Distress Ink Peeled Paint, Picked raspberry & Crushed Olive, Hot Glue Gun, Novu Jewel Drops Sea Breaze , Glitter Dust.


Instructions:

The ready top fold card measures, 6.5” by 9.5”. Cut panel of off white cardstock measuring 6.1” by 9.1” and adhere it on card using foam strips, choose second panel from paper collection measuring 5.9” by 8.9” adhere layer on first panel. Layer the panel using dries clear adhesive.
To create the frame, choose a flowery image from the paper collection and diecut with eyelet oval die. Cut two border frames from off white cardstock using eyelet oval die set and adhere together. Apply clear adhesive on frame and dress it with glitter dust. Stick this frame on the center of the card base.
For the flowers, stamp multiple images of mixed florals from Wild Aster Cling Stamp Set on White cardstock using Vibrant Fuchsia Archival Ink and cut them using their coordinating dies. Color the flowers using Picked Raspberry Distress Ink and shape them using Deluxe Flower Shaping Kit. Prepare two medium and two small flowers. Also, prepare 11 buds by shaping the smallest flower inwards, take 3 small flowers for each bud color two with fuchsia and 1 with peeled paint for sepal. Add yellow stamens in the center and create buds. For leaves, I have used Leaf green Archival ink for stamping and Peeled paint and crushed olive for coloring. Diecut with coordinating dies. Assemble a small bouquet of Wild Aster Florals around the frame as shown using hot glue. Add glitter to add extra sparkle to the flowers. For the fillers I stamped wild aster spray stamp set using Archival Leaf Green, colored with zig markers, and diecut using coordinating die.
Stamp sentiment with black archival ink and color it with zig markers. Embellish the card with Nuvo drops.


❤


Love to design these beautiful buds!


Thank You!