Good Morning Buddies Happy Wednesday!


Instructions : It is a ready folding card size is 9 inches by 6 inches. Cut panel on light
brown cardstock measures 5 7/8 by 8 7/8 adhere it on card base using
dimensional tape. Cut another panel which is slightly smaller then last panel
on Deluxe Paper apply cracked pistachio and vintage photo distress ink on the
panel randomly using ink brushes, apply vintage photo distress ink by using
stencil and ink blending brush on the card base, Randomly stamp the 'Good
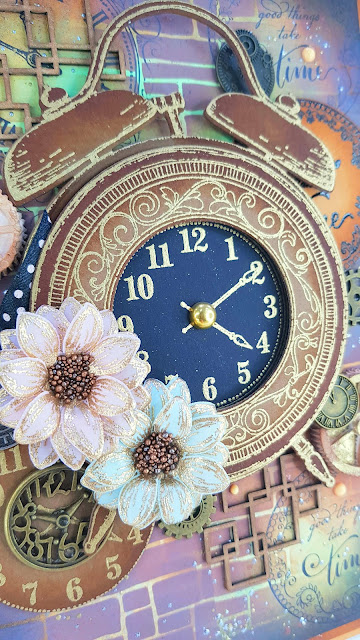
things Take Time' stamp on the panel using black ink from Timepiece Sentiments
Cling Stamp Set, and stamp center clock part of Elegant Moments Timepiece stamp
on the left corner of the card using black ink. sprinkle some Perissa embossing
powder on the panel and heat it from the back side.
Stamp the Good things take time image from Timepiece Sentiments Cling Stamp
Set on the light brown cardstock using versamark ink cover with black card
stock and heat it using heating tool die cut using coordinating die.
Stamp the clock and arms image on black cardstock from Simple Moments
Timepiece Stamp Set with versamark embossing ink cover with golden embossing
powder and heat it using heat tool, die cut using 3rd circle from same die set.
Make a hole in the center add arms and close by brads.
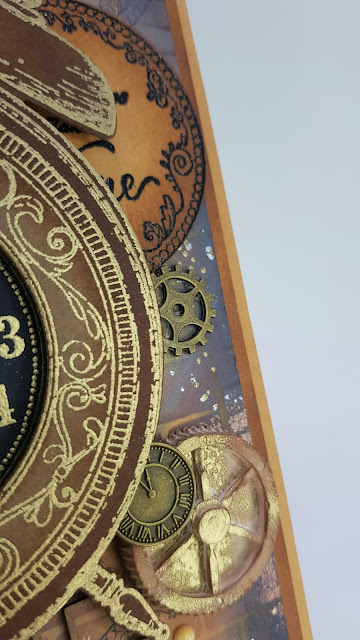
Stamp the clock image from Simple Moments Timepiece Stamp Set on brown
cardstock with versamark embossing ink 2x and cover with Gold Tinsel Embossing
Powder, heat it using heat tool, die cut using main clock die from Simple
Moments Timepiece Die Set and die cut second clock by using big circle die and
4th circle die and make clock frame window. Adhere foam dots from the back side
and set a side.
Color the edges of all diecuts with Vintage photo distress ink.
Adhere black clock circle on the main big clock die cut using clear glue,
set clock frame window on the black dial as shown.
For the flowers stamp second last flower sizes from rustic sunflower
collection on to the pink and mint vellum Paper using versamark ink cover with
gold tinsel embossing powder heat it using heating tool. Die cut using
coordinating dies, shape the flowers using shaping kit, make two flowers, add
three layers of same size for making each flower. Add clear glue in the centers
sprinkle mini prills.
Paint the moulds and wooden embellishments with Vintage photo distress ink.
Arranged all ready elements using dimensional tape and hot glue gun and
embellish the card with nuvo drops and metal charms.
Other : Die Cutting Machine, Brown Cardstock, Light Brown
Cardstock, Black Cardstock, Light Pink Vellum Paper, Mint Vellum Paper,
Versamark Embossing Ink, Metal Charms, Golden Embossing Powder, Black Embossing
Powder, Gold Tinsel Embossing Powder, Vintage Photo Distress Ink, Vintage Photo
Oxide Ink, Cracked Pistachio Distress ink, Ink Blender Brushes, Wooden
Embellishments, stencil, Molds, Brats, Brush, Wow Perissa embossing powder,
Dimensional Tape, Hot Glue Gun, palette knife, Ribbon.
Follow me on Facebook!
Follow me on Instagram!
Follow me on YouTube!
Pinterest!
Happy Crafting!


