Tuesday, 31 May 2022

Gorgeous Shaker Card With Wild Poppy - Heartfelt Creations

Hello Buddies, Happy Wednesday...
Hope you all are doing great, today I'm here with another inspirational Shaker Card, designed with Heartfelt Creations Wild Poppy Collection, I hope you will enjoy!


Its a ready folded card measures 9" by 6", cut panel on Deluxe Paper measures 8 3/4 by 5 3/4 and adhere it on the card base using dimensional tape. Cut another panel from wild poppy paper collection sheet # 1B measures 8 1/2 by 5 1/2.


Stamp the Wild Poppy Flowers on the Deluxe Paper using Versamark Embossing Ink, cover with white embossing powder, heat it using heating tool, die cut using coordinating dies, color the centers with leaf green ink and color the poppy edges with Archival Costal Coral Ink using dauber, shape the flowers using golf groove tool and heartfelt creations shaping kit and make few flowers using hot glue, add green mini prills in the centers, embellish the flowers with Nida Tanweer Magic Glitter Powder, art pebbles and rhinestones.


Stamp the sentiment from Heartfelt Creations Todays Quote Stamp Set using Archival Leaf Green Ink.


Monday, 2 May 2022

You're My Forever Person - Heartfelt Creations

Hello buddies...
I'm sharing beautiful card with all of you my friends, I designed this floral card with Heartfelt Creations Decorative Dragonfly Collection.


I used Vellum Paper to design Dragonfly.


I love leafy accents mould.


Do you like to add dry material in your cards? like I added wheat grass <3


Yes I'm crazy, I make these in Heartfelt Creations Leafy Accents Moulds lol


Wednesday, 23 March 2022

Pocket Tags Card For Father - Heartfelt Creations

 Hello Craft Buddies, 
Today I'm sharing simple pocket tag card, designed with Heartfelt Creations Tag Die & Floral Banners.


Check Full Instructions & Product Details HERE!


Instructions:

Its a ready folding card measuring 6 by 7 1/2 inches, Trim a panel on pink cardstock measuring 5 3/4 by 7 1/4 inches, adhere on to the card with clear glue, trim panel on deluxe card measuring 5 1/2 by 7 inches and adhere on to the card front. Trim panel from sweet pea paper collections measuring 5 1/4 by 6 3/4 inches and adhere on to the card using clear glue.

Die cut classic companion border die on deluxe card and gold luxe card and adhere together and apply glue on the three plain sides from back and add on the bottom of the card front and make a pocket.

Die cut 2 tags on the deluxe card from Album Tags Die Set and inside tags on the pattern paper and adhere small tag on the big tag using clear glue, make a hole on the top of the tags and add ribbon.

Stamp banner on the deluxe card from Vining Clematis Banner Stamp using cactus flower ink and die cut using coordinating die, color the edges of the banner with Kitsch flamingo ink using daubers and stamp inside the sentiments from Thank You Cling Stamp Set using Leaf Green Ink. Cover the tag with Magic Glitter Powder.

Other Products: Pink Cardstock, Kitsch Flamingo Distress Ink, pink ribbon, Nida Tanweer Glitter Powder, Punch Machine.

Follow me on Facebook!
Follow me on Instagram!
Follow me on YouTube!
Pinterest!

Friday, 25 February 2022

EZ Step by Step Tutorial: Use your Die Cuts to Create an Elegant Layered Card the EZ Way!

 Hey Friend!

Are you a crafter that loves to create something different? Create elegant layers with your die cuts to create a quick and EZ card! Make it simple or take it to another level and add floral embellishments the choice is yours!


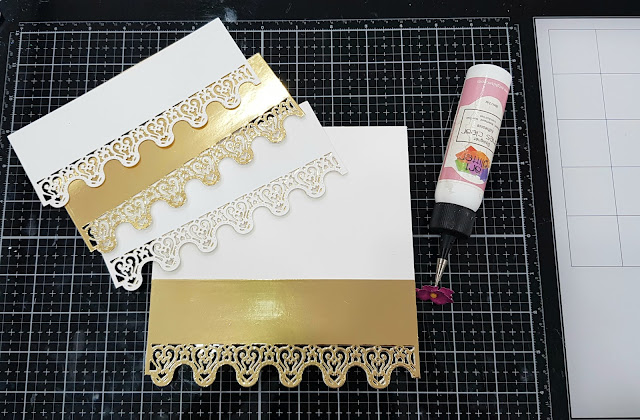
Step 1: Border Cutting.

♥ Place the large die on the Deluxe Flower Shaping Paper.

♥ Die cut 2 whole frames and make 4 borders.


Step 2: Die cut 4 borders on Luxe Gold Cardstock.

♥ Clean all 8 borders using spellbinders tool.


Step 3: Layering. 

♥ Adhere 2 golden borders under the white borders.

♥ Adhere 2 white border under the golden border using clear glue. 


Step 4: Create the card base.

♥ Trim a Deluxe Flower Shaping paper measuring 11 3/4 by 6 3/4 inches.

♥ Score on the long side in the middle, fold it in half and ready the card base.
 

Step 5: Adhere first golden border on the card front bottom edge using clear glue.


Step 6: Adhere dimensional tape on the back side of remaining three borders.


Step 7: Adhere all layers by overlapping.


Step 8: Create decorative top for card base.

♥ Die cut the inside die from the Classic Companion Border Die set on gold card.

♥ Trim the edges with paper trimmer. 

♥ Adhere on the top empty part using clear glue.
 

Step 9: Add Sentiment.

           ♥ Stamp the sentiment on Deluxe Flower Shaping Paper from Thank You Sentiment Stamp Set using VersaMark Embossing Ink. 

           ♥ Cover with Gold Tinsel Embossing Powder and heat it using Heating Tool.
           ♥ Die cut the sentiment using the Cut Mat Create 1A Die set.
 

Step 10: Add the sentiment using dimensional tape.